E18 | NOLA Shutters, Hardwired Alarms | Ask This Old House
Season 24 Episode 18 | 23m 42sVideo has Closed Captions
New Orleans shutter installation; choosing a fertilizer; hardwired smoke detectors.
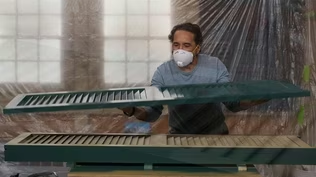
Nathan Gilbert upgrades shutters in a historic New Orleans neighborhood, matching the original style and material. Jenn Nawada and Lee Gilliam explain how to read fertilizer labels and choose between organic and synthetic options. Heath Eastman upgrades battery-operated smoke detectors to a hardwired combo alarm system. Heath asks a local fire chief for safety tips on installation beforehand.
Problems playing video? | Closed Captioning Feedback
Problems playing video? | Closed Captioning Feedback
Funding for Ask This Old House is provided by The Home Depot, Renewal By Andersen, and ChipDrop.
Support provided by:


E18 | NOLA Shutters, Hardwired Alarms | Ask This Old House
Season 24 Episode 18 | 23m 42sVideo has Closed Captions
Nathan Gilbert upgrades shutters in a historic New Orleans neighborhood, matching the original style and material. Jenn Nawada and Lee Gilliam explain how to read fertilizer labels and choose between organic and synthetic options. Heath Eastman upgrades battery-operated smoke detectors to a hardwired combo alarm system. Heath asks a local fire chief for safety tips on installation beforehand.
Problems playing video? | Closed Captioning Feedback
How to Watch Ask This Old House
Ask This Old House is available to stream on pbs.org and the free PBS App, available on iPhone, Apple TV, Android TV, Android smartphones, Amazon Fire TV, Amazon Fire Tablet, Roku, Samsung Smart TV, and Vizio.
Keep Exploring


This Old House Insider Newsletter
Get This Old House exclusive stories, tips, and behind-the-scenes information delivered right to your inbox every month.Providing Support for PBS.org
Learn Moreabout PBS online sponsorship♪♪ Kevin: On "Ask This Old House," our experts travel across the country to answer questions about your house.
♪♪ Today, Nathan heads to a historic neighborhood in New Orleans to help some homeowners install shutters.
Then Jenn and Lee talk fertilizers, organic versus synthetic, when to use and how much?
And do you know how many smoke detectors you should have and where to put them?
Heath answers these questions for a homeowner on "Ask This Old House."
♪♪ ♪♪ Nathan: Hi, Emily.
Emily: Hey.
Nathan: Hi, Lenna.
Lenna: Hey, Nathan.
Nathan: Nice to meet you.
This is a beautiful neighborhood.
Tell me a little bit about it.
Lenna: We're in the Bywater here in New Orleans.
Um, super historic neighborhood.
Really great walkability.
It's beautiful.
These homes are all old, historic styles.
We personally have a side hall cottage which we truly fell in love with.
Nathan: Have you guys been here long?
Emily: Uh, a little over a decade, we've been in this neighborhood.
Lenna: Yep.
And we've owned the home for four years.
Nathan: Nice.
Congratulations.
Lenna: Thank you.
Nathan: You made some improvements over the years?
Lenna: We have.
Yes, absolutely.
You know, an old house, it needs some work.
Nathan: It needs some love.
So you wrote me about these shutters.
Emily: Yeah.
We have these beautiful shutters, but they've been there a while.
They've started to deteriorate.
And, you know, we like to close them during hurricanes and storms, and we can't quite do that right now.
Nathan: Yeah, these are getting soft.
I can see a little bit of rot.
But you do live in a historic area.
I'm sure you know that.
There's the rules that the city dictates when you're working on historic homes.
So they're gonna talk to us about things like wood material that we use, hinge style, hinge location, even paint colors.
It's good to know someone in the area that has all those details.
Luckily, I have a friend that's in the area, Scot, great carpenter.
He's gonna come by and give us a hand.
While we're waiting for him, let's take these shutters off.
Lenna: Let's do it.
Yeah.
Emily: Let's do it.
Nathan: These old cast-iron hinges are really unique.
Uh, this set of shutters has three on each side.
I had to loosen up the screws on the middle one so I could swing the shutter out and take it off as it's intended.
Pops right off those pins.
When we put these back, we're not gonna put this third hinge on.
Only go top and bottom so we can take them off easily.
Hey, Scot.
Scot: Hey, guys.
How you doing?
Good morning.
Nathan: These are the homeowners, Lenna and Emily.
Scot: Hi, Lenna, Emily, nice to meet you.
Lenna: How are you doing?
Scot: Good, good.
Nathan: Look at this beautiful shutter.
This is incredible.
This is perfect.
So we spoke.
We are in a very historic area here.
What do we need to do to fall in line?
Scot: Um, basically, what you're doing right now is we've applied for permits with HDLC.
Um, they have guidelines.
They want to keep the neighborhoods as close to their original content as they were originally constructed back in the days.
So you want to kind of keep in line with that.
They apply and give the committee permits of what they want to do and ideas what they want to do.
They approve it.
Yes or no.
Nathan: Okay.
Scot: They're staying pretty much with what they had before originally going back just with a newer, fresher look.
Nathan: Yep.
Scot: The shutters they had before, a little rotten.
These are Spanish cedar, which is very conducive to the element and the climate here in New Orleans.
Nathan: Perfect.
Scot: But this is a little bit better shape than the rotten, softer ones we had before.
Nathan: And then how about the hardware?
Scot: The hardware is absolutely replica of cast iron antique historical shutters.
We have the hinges, a slide bolt and a catch latch.
Nathan: So you said we're gonna go from three hinges down to two hinges?
Scot: Exactly.
Also, two hinges is more conducive to what's the look of the rest of the neighborhood.
So the city is okay with that.
They approve that.
Nathan: Perfect.
3 to 2.
No problem.
City's happy.
Scot: Everybody's happy.
Nathan: Alright.
Awesome.
Let's get to work.
Lenna: Alright.
Emily: Alright.
Nathan: To get started, we will Dutchman in the old mortises for the middle hinge we aren't going to replace.
♪♪ ♪♪ Then we can work on the fit of the shutters by measuring and cutting the bottoms to height.
34 9/16 at the bottom.
Scot: Okay.
♪♪ Nathan: Then Scot can plane the edges at a slight angle to ensure a tight fit when the shutters are closed.
♪♪ It's important to keep track of the orientation of the shutters during these steps.
Since we are cutting them to fit when they are closed, not when they are open, reference marks can be helpful with this step.
Now we can mortise the shutters to receive the new hinges.
♪♪ Since we've exposed raw wood, we'll hit all the raw edges of the shutters and the window with primer to protect it from the weather.
♪♪ Finally, we can mark, pre-drill and screw in the hinges.
♪♪ ♪♪ With the hinges in place, we can secure the locking hardware.
Nice, Scot.
♪♪ ♪♪ Alright, open them up.
Working good?
Emily: Wow!
Lenna: Oh, my gosh.
Emily: Wow.
So nice.
Lenna: They're beautiful.
Look at that.
Nathan: So you got your slide bolt at the top there.
So that's gonna connect.
Once you have it shut, you also have these catches.
So those will help hold the bottom.
A little bit of homework for you guys, though.
Alright?
So we did some cutting.
We did some priming.
If you could touch that up with a little bit of paint.
And then any other little scratches or nicks that might have happened during install, if you just touch those up, you'd be good to go.
Lenna: Thanks y'all so much for everything.
Emily: Thanks for coming all the way to New Orleans.
Nathan: And we couldn't have done it without Scot today.
So, Scot, thanks for everything.
Scot: You're welcome.
Hope you enjoy your new shutters.
Emily: Thank you.
Y'all are the best.
Nathan: See you guys.
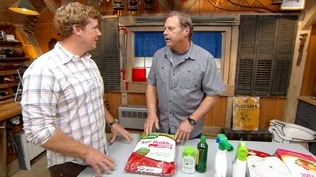
♪♪ ♪♪ Lee: What do you like?
Do you like organic or do you like synthetic?
Jenn: What do you think I like?
Lee: I think you're... Kevin: Are you guys talking fertilizer behind my back?
Lee: Hi, Kevin.
Good to see you.
Kevin: Good to see you, Lee.
Hi, Jenn.
Jenn: What's up?
Yes, we are.
We're discussing synthetic versus organic.
And really, how much has changed in our industry over, like, the past 10 years.
Kevin: Which I want to talk about, but for my benefit, can you just pull it back a little bit?
Let's go a little higher.
Just fertilizer in general.
I mean, like, what is it, what's it doing and what are the differences?
When do I use it?
What do you got?
Jenn: I mean, basically they are different ingredients, whether it's synthetic or organic, and that they are fine-tuned to a specific need of your plant.
So like going back when Roger would say right plant, right place, right fertilizer, right place, you'd have to know your plants, your soil conditions and your existing lawn.
Kevin: So every bag is a different concoction and you gotta know what you're actually grabbing.
And I guess what's on the bag.
Lee: Yep.
These numbers here, NPK numbers here.
Kevin: NPK?
Lee: Yes.
So you have nitrogen, phosphate and potassium.
Kevin: Okay.
Lee: Okay?
And the nitrogen is good for in the lawn area.
If this number was higher, it'd be good for grasses, so it gives you that extra punch of color.
Exactly.
And that's what we like, right?
Kevin: Right.
100%.
Lee: So we got to do that.
Jenn: Right.
And then the middle number -- the phosphorus.
Lee: Phosphorus for the root system and also for little punch of color, things like that.
Kevin: Potassium or K for...?
Jenn: The overall strength of the plant.
So the overall strength and structure.
Kevin: I presume these are organics over here?
Do they have the number system as well?
Jenn: They do.
So the organics come from natural materials.
You're gonna get it from compost, manure, bone meal.
Right?
So this one is manufactured.
Kevin: When you say manufactured, from organic... Jenn: From organic materials.
And there's a whole laundry list.
This is your regular compost.
And then this one is milorganite.
Lee: Yes.
Milorganite -- love this.
This is really good for the lawn as well as your flower beds and everything else.
Jenn: Mm-hmm.
Lee: Human waste.
Kevin: Oh, so like literally the same effect of manure.
Lee: Correct.
Kevin: Human manure, I guess.
Lee: Yes.
Kevin: Okay.
Jenn: But each of these pellets and sizes have been just -- They're specific to the NPK ratio on the bag.
But the deal with organics, it takes it a little bit longer to break down because the earthworms and the microbes.
Lee: It's good for the soil overall.
Jenn: Yeah, the microbes and the soil, they break it down.
And then once that is digested, the plant can uptake those nutrients.
Lee: Where this is like a quick punch, bone will green it up, grow fast.
Kevin: So generally speaking, more potent on the synthetic side, a little less potent on the organic.
Jenn: You got to look at it -- Okay.
Think if your plant is sick, that's gonna be your antibiotic.
That's gonna be your treatment.
So if you want fast-acting, go synthetic.
Ideally I try to go organic, but sometimes you need to supplement with synthetic.
Kevin: So that was my next question.
Like, are you strictly an organic-fertilizer person or strictly a synthetic or can you mix and match?
Like, how would you mix and match?
Lee: I would mix and match this, these two here, the synthetic and the milorganite with doing the lawn.
Okay?
And then also if I want to put this in maybe some flower beds and things like that, this works really well.
Kevin: Give it a nice punch.
Jenn: And I would do the same with, you know, everything's established but, "Oh, my plants aren't blooming."
I might give it a kick of the middle number or use something called superphosphate, phosphorus, and that gives for the blooms and the fruits, right?
Or if you know your roots are weak, you know, they need some more attention, you hit it with the last number, the potassium.
Kevin: So I'm hearing sort of long-term, consistent, good soil health, a little faster acting, higher concentration.
I don't get the sense that I can use too much of that.
I mean, obviously I don't want to kill my lawn with too much compost.
Jenn: It's a very good question.
Right?
So, if there's too little, you know, it's not -- Your plant's gonna suffer.
It's gonna struggle.
Like, you want to give it that little dose of vitamin to get it back to health.
But if it's too -- If you put too much in excess, you could also burn your plant.
And in this situation, more is definitely not better.
It can cause environmental impacts.
You know, heavy rains, it'll leach into the ground, go into watersheds, create algae blooms in lakes.
You know about regulations, right?
Lee: Correct.
You have to be aware of where you're living and where you are and read the directions on these things.
You know what I mean?
But this is the best way to go for a lawn situation.
But you have to be careful about, like Jenn says, the water situations and things like that.
Kevin: So if you do go on the synthetic route, use it appropriately.
Lee: Correct.
Kevin: Use it in the right amounts and understand it.
Jenn: Yeah, more is not better.
People have a tendency... It's just human nature to put more.
You think it's gonna be better.
Just follow the ratio on the bag.
There's a formula.
Kevin: Okay.
Cool.
Good information.
And then I guess, finally, is this all you guys talk about when you're alone?
Lee: Pretty much.
Right?
Jenn: Hey, it's important, man.
♪♪ Heath: House fires are one of the leading causes of damage to a home.
They can escalate very quickly from a very small flame to a full-blown fire in less than 2.5 minutes, causing over $10 billion in damage annually.
So when a homeowner reached out about installing hardwired smoke detectors in her home, I thought this was a perfect opportunity to reach out to the local fire chief and have him help explain what detectors to choose and how to locate them properly.
Tracy: This is great.
Thank you.
Heath: Hey, chief.
Thanks for coming out.
Stephen: Hey, Heath.
Good to see you again.
Heath: You must be Tracy.
Nice to meet you.
Tracy: Hey, Heath.
It's nice to meet you.
Come on in.
Heath: Let's take a look inside.
Stephen: After you.
Heath: Alright, Tracy.
So I saw that you wrote in about installing new smoke detectors.
Can you tell me a little bit about the system you currently have?
Tracy: Sure.
I had a security system for a while, and then I went to battery operated.
Heath: Okay.
Tracy: I don't have too many around right now, but I really need something that's safer.
Heath: Does that sound a little familiar?
Stephen: Yeah.
So it sounds like she had what we call a household fire warning system.
Probably monitored by a central alarm company that would, um, call you directly in case the alarm went off.
At some point in time, you decided to go with battery-operated detectors.
Only that did not send a signal anywhere else.
And now you want to bring your house up to present-day code with hardwired, interconnected smoke and carbon monoxide alarms.
Tracy: Yes.
Heath: That's the great point, is the interconnected portion.
So right now with the batteries, if something were to happen in the basement, it's only gonna make noise in the basement.
If you're on a second floor or a bedroom further away, especially if you have the summertime with an air conditioner or a fan going, you may not hear that detector going off.
So that's a great point of the interconnect.
Stephen: That is absolutely the best system to have.
Um, early detection in a fire, seconds count, to escape from your bedroom or your basement.
So that's what we would recommend in all instances that people use interconnected smoke and carbon monoxide alarms.
Heath: Sounds great.
So when it comes to choosing the detectors, we have two different kinds I'm aware of -- ionization and photoelectric.
Does that sound right?
Stephen: That is correct.
So now if you were to build or remodel your house, you can only use photoelectric smoke detectors.
Heath: Got it.
Stephen: Prior to that, depending on when your house was built or remodeled, you could also use ionization smoke detectors, right?
But they could not be placed within 20 feet of a kitchen or a bathroom that had a shower.
However, they go into false alarm frequently.
So that's why we have the photoelectric requirement.
Heath: Yeah, that kind of sounds familiar.
Back in the day, when we used to have some of the smoke detectors a little too close to a bathroom -- They were the ionizations -- We had to change them to the photos so they weren't always going off because of the steam off the shower.
So it's good.
The other thing that we're gonna use are the photoelectric smoke combination with the carbon monoxide.
That way if you have an issue with a carbon monoxide, it'll tell you throughout the entire house.
Stephen: Yeah, that is correct.
So the way we want to do that is we want you to install a combo detector that has a voice and a tone.
Right?
So if there is a carbon monoxide event in the basement and it's during the night, the detector that's required outside your bedroom is gonna tell you what it is.
Is it a smoke event or is it a carbon monoxide event?
And that is done through a tone and a voice.
Tracy: That's great.
So I'll know which one it is.
It'll say fire or carbon monoxide.
Heath: Yeah.
It's perfect.
Tells you either one.
So I think we have a pretty good idea for the system we want to install.
Now it's just a matter of locating where they're gonna go.
So let's start down this hallway and take a look at the bedrooms.
Tracy: Let's go.
Right down here.
Heath: Alright.
So looks like we have three bedrooms.
Tracy: Mm-hmm.
Yep.
Heath: So we want one in each bedroom.
Stephen: That's correct.
And where we want to put it is just inside the bedroom, preferably within 3 to 5 feet of the door.
We want to keep it away from any ceiling fan, because that can certainly interrupt the detector from activating.
Heath: Got it.
Stephen: We also have a bathroom with a shower, and you have a kitchen around the corner.
So ideally, I would like to see the detector 3 to 5 feet further down the hallway and meet all the requirements.
Heath: What about a second floor?
Where do we put -- Stephen: The requirement is at the base of all stairs, not within the stairwell.
So we want to place it once you get off the landing, on the ceiling.
We want to protect the means of egress.
Heath: So what if we had an attached garage?
Stephen: So the minimum requirement is one heat detector located in the center of the garage on the ceiling.
Heath: So now that we kind of have a good idea of what we're gonna do in the bedrooms, we come out to the hallway and I know we have to have one within 10 feet of the bedroom doors here.
We can see you have the battery one that's right here.
But the thing I notice is that vent.
And that's a fairly common issue.
So what's the guideline for putting one near a vent like that?
Stephen: Yeah.
We want to keep it away from the vent for two reasons -- the dust collection on the detector and also from any air movement delaying the action.
Tracy: Okay.
Heath: Great.
I think we're in pretty good shape.
That's great information.
Chief, I can't thank you enough.
Tracy: Thank you very much.
Heath: And as always, thanks for coming out and helping.
But it's very important to drive home the fact that if you have questions when you're doing this, please contact your local fire department.
You guys are very happy to help.
Stephen: Absolutely.
Always contact your local fire department for advice here in Newburyport.
We welcome the phone calls.
We want to make sure you purchase the right detectors and put them in the right spots.
Heath: Tracy, we got some work to do.
Tracy: Alright, let's do it.
Heath: Thanks again.
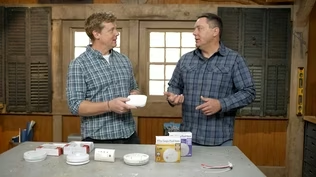
Alright, Tracy, before we go ahead and install these, I just want to go over a couple of different detectors we have and kind of show you what you already have and what we're gonna install.
Tracy: Okay.
Heath: What you currently have are the battery-operated ones, which is great if you have nothing.
So very simple.
They just clip up like you saw.
You have a couple of batteries.
When they die, they die.
You replace them.
This is what we've been installing lately.
I actually have these in my own house.
This is a hardwired detector, battery backup.
And it does both -- the smoke and carbon monoxide.
Fairly simple.
When we do the hard wire, it's gonna be color to color for the wires, black to black, white to white, red to red, and the grounds buried together.
And then fairly typically we'll either have a couple of AA's or a 9-volt battery that goes here.
So if you've ever heard that chirp, that single chirp at 2:00 in the morning 'cause that's the only time it ever happens, and it's about a minute apart and you're trying to chase it down... Tracy: Trying to find it.
Heath: ...that's what it is.
It usually means it's due for a battery replacement, but since we don't want to deal with that anymore either, we now have detectors that have a 10-year sealed battery.
So the unit is good for its 10-year cycle.
Sealed battery.
You don't have to touch anything, so it's hardwired.
The battery is built in and you're good to go.
Tracy: Now, what if it doesn't chirp?
And how am I ever gonna know when it's up in 10 years?
Heath: I wouldn't remember when the 10 years are up either, so it should chirp and give you an end of life cycle signal of some kind to tell you that it's time to be replaced.
But if it doesn't, on the backside of them, they all have a date.
It tells you what the manufacture date was.
So if you have one and you're not sure and you take this down, it's past that 10-year mark, it's a good time to replace it.
Tracy: Okay.
Heath: Finally we're just gonna go around to install these.
Use a hole saw to cut in these round old work boxes.
Run our 14/3 NM around.
Go ahead and mount these and we'll be good to go.
Tracy: Great.
Heath: You ready?
Tracy: I'm ready.
Heath: Alright, let's do this.
Tracy: Thank you.
Heath: So what I've done is I've drilled a hole from down here to up in the attic.
So what I want to try and do now is I'm gonna take these fiberglass fish tapes.
I'm gonna try and push these up.
It's a straighter shot, a little easier to kind of push straight through the hole.
And I'm just gonna try and line it up.
Now, I should need two of them.
The wall is about 8 feet tall and these are 5-foot sections and just thread together.
So we're going up.
Ah, right there.
So that is the top plate of the wall.
So now what I want to do is try and wiggle this around a little bit and find that hole.
And they do line up pretty well.
So it shouldn't be too bad.
Hopefully.
Right there.
So that is popping up into our attic.
So what I can do is tie the wire onto this now, go to the attic and pull this right up.
We have the wire taped on.
So I'm gonna go ahead and start pulling that up.
And there's our wire.
So the first thing I want to do is measure where we want to put the hole.
And I already have an idea of where the trusses are upstairs.
So I want to be about [sighs] 3 feet over.
Let's poke this up just to make sure I'm clear, which I should be.
And next, I'll use a little tie wire that I've pre-bent at 2 inches.
I'm using a 3 3/4 hole saw for this, so at 2 inches, it should be excessive that I can slide up and spin around and make sure that I clear everything.
And I can spin around high and low.
And I know there are no obstructions for that junction box.
Now that we have that... I have my 3 3/4 inch hole saw and my dust collection bowl all set up to collect everything.
And just like that, we have our opening.
Alright.
So I've got this hole cut out, and we have two ways we can do this.
We can either fish the wires around to the location, pull them down, and then make them up and push them up.
Or in this case, where I have nice attic access, I'm gonna go ahead and cut all the holes and install the boxes ahead of time, and then go upstairs and I can staple right to them and stuff the wires through.
That's a nice snug fit.
And now I'll just spin the ears out.
Alright.
So I'll repeat this process for the other two bedrooms.
And then I can go upstairs and pull the wires over and push them through and then we can make them up.
♪♪ Alright.
Now, since this is an interconnected system, we want everything to talk to each other.
This box happens to have two wires.
So at the start, I'll have a single wire.
Just one of these.
Then I jump from room to room to room to hall or basement or wherever else.
So single in the first one.
Then as I come to the next box, I come back out.
That's why I have two.
This goes to the next room, so it lets me provide the power with the black and white on both and the red is my interconnect.
So this red is continuous between the entire loop.
So if something happens, they all talk to each other.
♪♪ ♪♪ Alright, Tracy, so all the hard work is done, all the detectors are up.
Everything's powered.
It's ready to give them a test.
You ready?
Tracy: I'm ready.
Heath: Alright.
You got hearing protection?
It's gonna get loud.
Tracy: Yep.
Alright, I'm ready.
Heath: Test.
Computer voice: Testing.
[ Alarm blaring ] Heath: Oh.
Yeah.
That'll wake you up, huh?
Tracy: That's definitely gonna wake me up.
Heath: And that'll run through a couple of cycles and you can hear -- kind of hear -- It's telling you that it's either smoke or it's carbon monoxide.
So it definitely lets you know what's going on.
It's a long cycle.
Tracy: Yes.
That will wake me up, for sure.
Heath: There we go.
Good.
We can take those out now.
Well, I think you're all set.
Tracy: Great.
Thank you so much.
I feel so much safer.
This is great.
Heath: That was a great project.
Happy to help.
Tracy: Thank you, Heath.
♪♪ Kevin: Next time on "Ask This Old House," Mauro helps a homeowner design and paint an accent wall.
Woman: I love it.
It looks amazing.
Kevin: Then do plants clean the air?
Can they repel mosquitoes?
Jenn discusses some of these common plant myths.
And when homeowners ask for an affordable patio option, Mark suggests installing a pea-stone patio.
All that on "Ask This Old House."


- Home and How To

Hit the road in a classic car for a tour through Great Britain with two antiques experts.


Support for PBS provided by:
Funding for Ask This Old House is provided by The Home Depot, Renewal By Andersen, and ChipDrop.